Riccardo Lorenzon's blog
A blog of a coding and pizza eater specialist.
Using AWS Vpc to set up a Wordpress application
For several projects i’m currently working on, a AWS Solution Architect associate certification is required.
I don’t actually believe in certifications as a way to prove any kind of knowledge, i found them useful to have an overview of how a certain product or service works and which kind of problems it’s meant to solve.
Having worked with AWS for more than 5 years i can say that i got my hands dirty with most of the topics involved. Although some of them are completely new, and i must say, interesting.
One that grabbed my attention is Amazon VPC. VPC lets you provision a logically isolated section of the AWS Cloud where you can launch AWS resources in a virtual network that you define. Most important is that you can define additional subnetwork within the network, with different access security rules.
I found VPC a terrific tool to be used to set up an environment for a common web application, like for example Wordpress. I decided then to dedicate one post on how to set up a Wordpress application using VPC(disclaimer: i don’t really like WP, but i find it extremly easy to set up, therefore this choice).
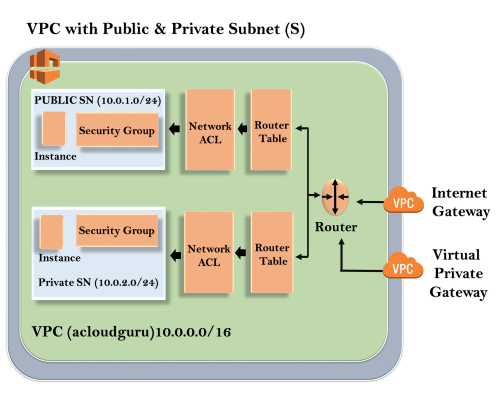
This is what we are gonna create:
Requirements
- an existing aws account(Amazon offen a free tier for new accounts)
Creating the VPC
First thing to do is to connect to our aws console.
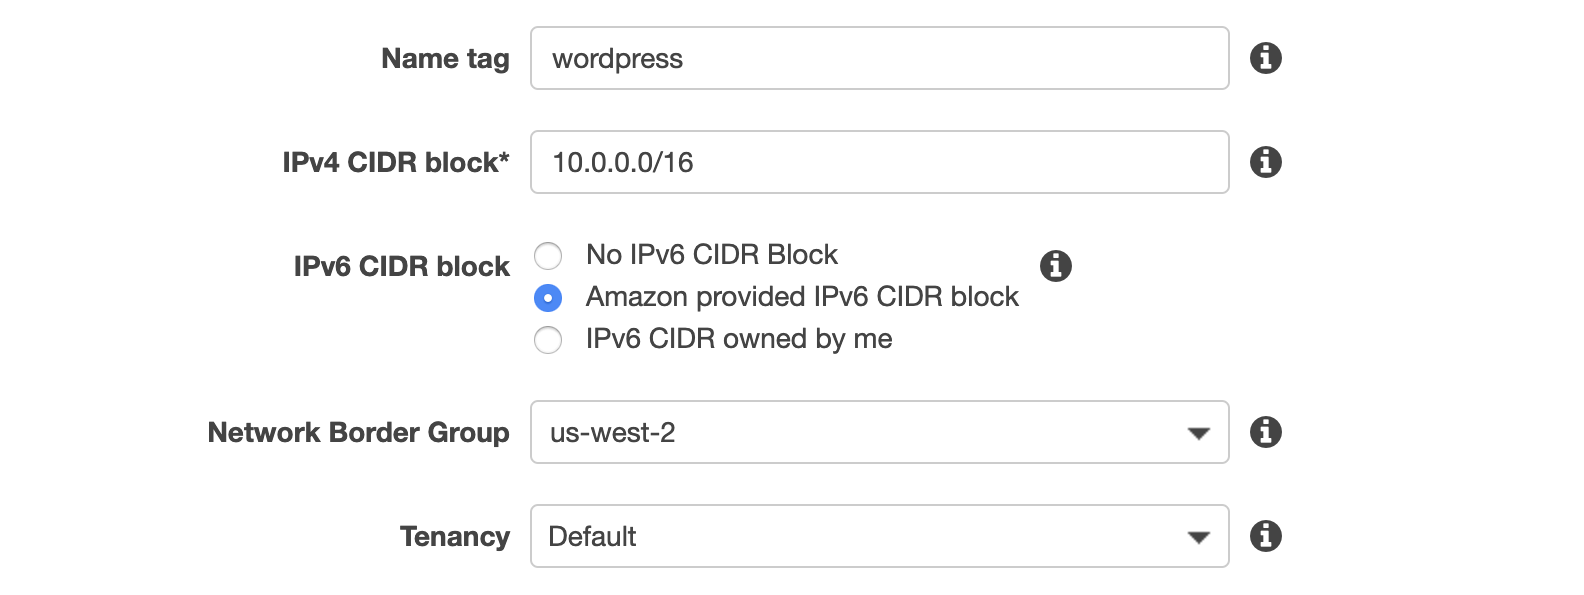
Then create a new VPC(VPCs > Create VPC), specifying:
 As you can see, our VPC will use IPs ranging from
 10.0.0.0 to 10.0.255.255. according to the CIDR notation.
The next step will be to create two subnets within the VPC, one publicly accessible via http or https and reserved to the web application, the other dedicated to the db, not publicly accessible, but still accessible from the web server and from a sysadmin via SSH.
Creating the public subnet
To create the public subnet, go to Subnets > Create subnet, specify the VPC you created on the previous step, and assign as IPv4 CIDR block 10.0.1.0/24. You can choose another IP range if you want, it’s important that this IP range is contained in the one of the VPC you created.
In this case we want a public IP address to be assigned to each instance of the public subnet. In order to do that we must select the subnet, and then presso on Action > Modify auto-assign IP setting. If we don’t do that, no public IP address will be assigned ot the instance, and it will be necessary yo use an elastic Ip.
You might notice that there is nothing in this setup that makes this subnet public. If we try to start a web server in this subnet we will see indeed that it is not reachable from the internet.
This is because VPC are by default isolated from the internet. In order to let requests in, we neet an internet gateway, and to open the routes related to the http requests in the route table.
An internet gateway is a VPC component that allows communication between instances in the VPC and the internet, we are gonna use it to access the internet from the EC2 instances in the public subnet, and to let the requests to the web server in through the route table.
In order to create an IG, go to Internet gateways > Create internet gateway, after that remember to attach the created IG to your VPC. Only one IG can be attached to a specific VPC.
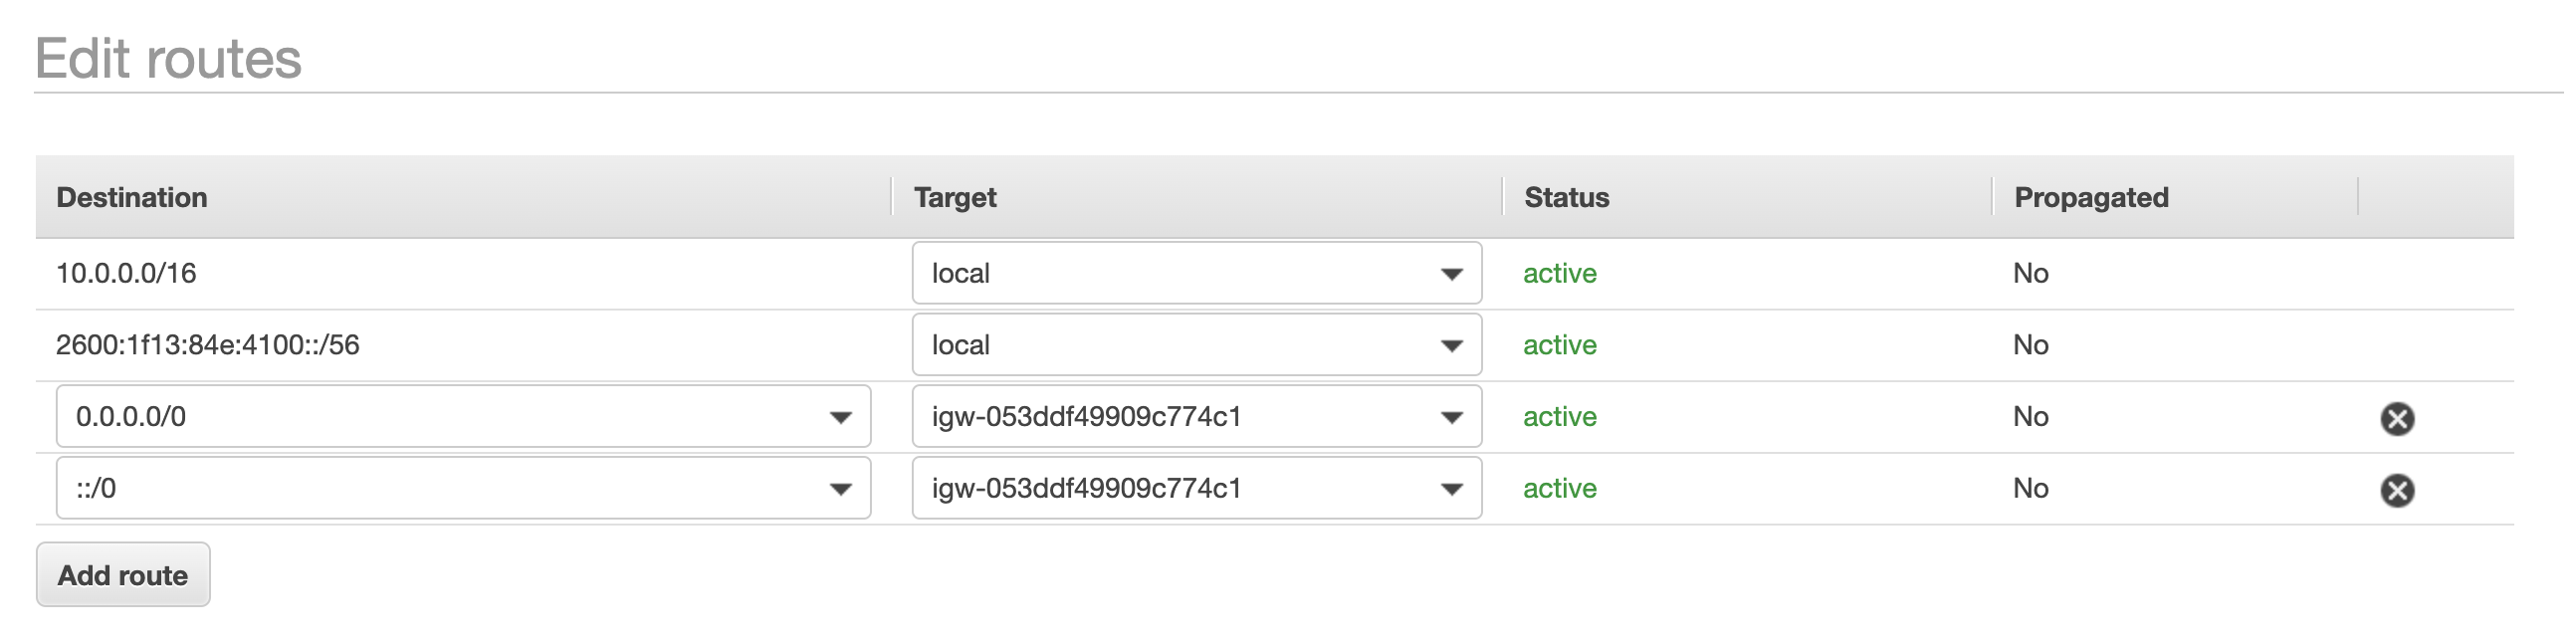
After that configure the Route Table of the public subnet in order to allow traffic to the internet(0.0.0.0/0).
Once we have done it, we can create our web server, and configure wordpress!
Creating the private subnet
To create the private subnet you can follow the first steps of the previous paragraph, setting as CIDR block 10.0.2.0/24 in order to differentiate the IP addresses of the two subnets.
Create the Web instance
In order to our application to run, we need to install a web server and a database server.
We are gonna use Amazon Linux 2 virtual machines, although any other linux distro can be chose, the script might need to be changed accordingly.
For what concerns the web server, we are gonna install httpd, php and then download wordpress in /var/www/html.
Let’s start by creating a linux instance in EC2.
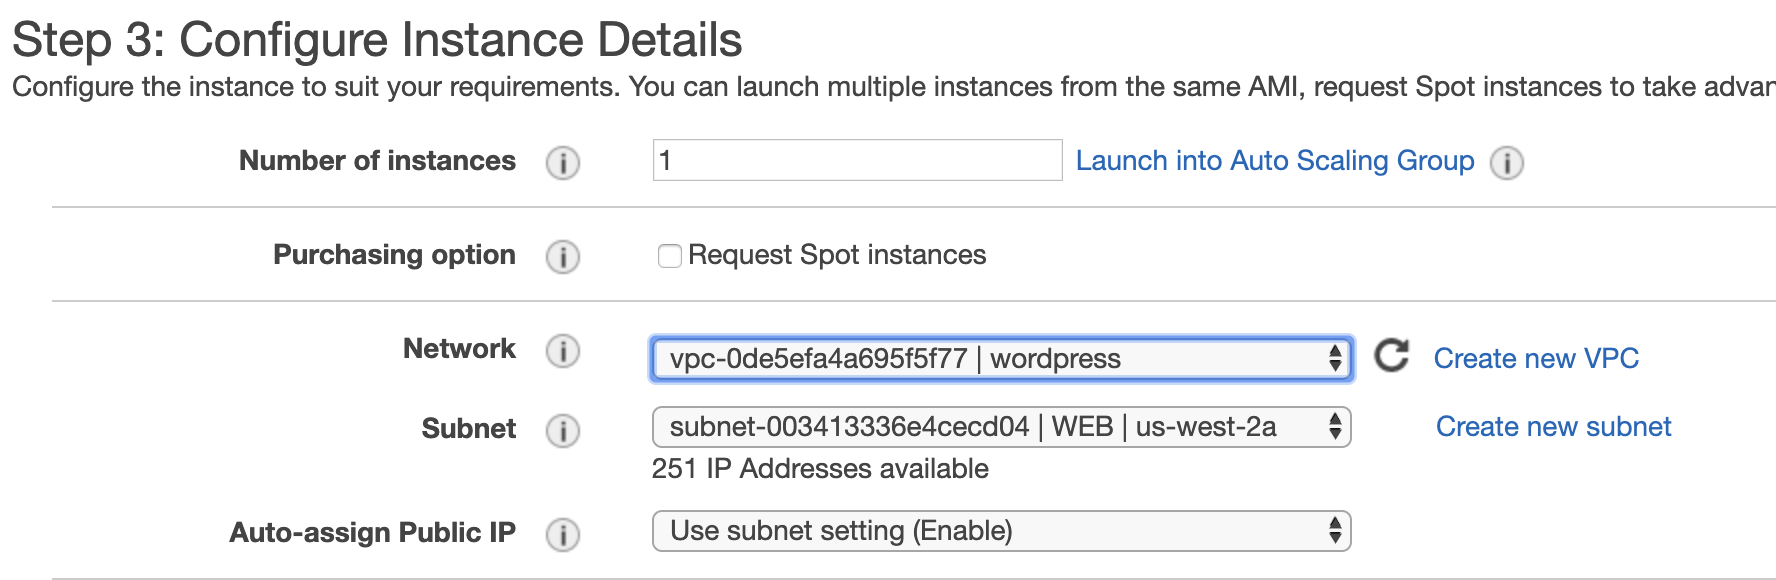
Assign the VPC and the public subnet we created in the “Configure Instance Details” page, edit the “User data” with the commands to run when the instance is created:
#!/bin/bash
yum update -y
yum install httpd -y
amazon-linux-extras install -y php7.2
systemctl enable httpd
systemctl start httpd
cd /var/www/html
wget http://wordpress.org/latest.tar.gz
tar -xzvf latest.tar.gz
mv wordpress/* ./
Make sure to specify on the security group to add HTTP and HTTPS from the internet in the inbound rules:

Create the DB instancee
For the DB instance we will follow the same procedure of the previous point to create a new instance.
The subnet we will choose is the private one.
In order to install mysql we need internet connection, since this instance will be in the private subnet there is no internet gateway associated. To overcome this issue we create a NAT gateway on the public subnet, we then modify the route table of the private subnet in order to point to that gateway for all the requests torwards the public internet.
This time we will configure the script in order to install mysql:
#!/bin/bash
yum update -y
wget https://dev.mysql.com/get/mysql57-community-release-el7-9.noarch.rpm
rpm -ivh mysql57-community-release-el7-9.noarch.rpm
yum install mysql-server
systemctl enable mysqld
systemctl start mysqld
mysql -e "CREATE DATABASE wordpress /*\!40100 DEFAULT CHARACTER SET utf8 */;"
mysql -e "CREATE USER riccardo@localhost IDENTIFIED BY 'blah';"
mysql -e "GRANT ALL PRIVILEGES ON wordpress.* TO riccardo@'%';"
mysql -e "FLUSH PRIVILEGES;"
Connect the WEB server to the DB instance
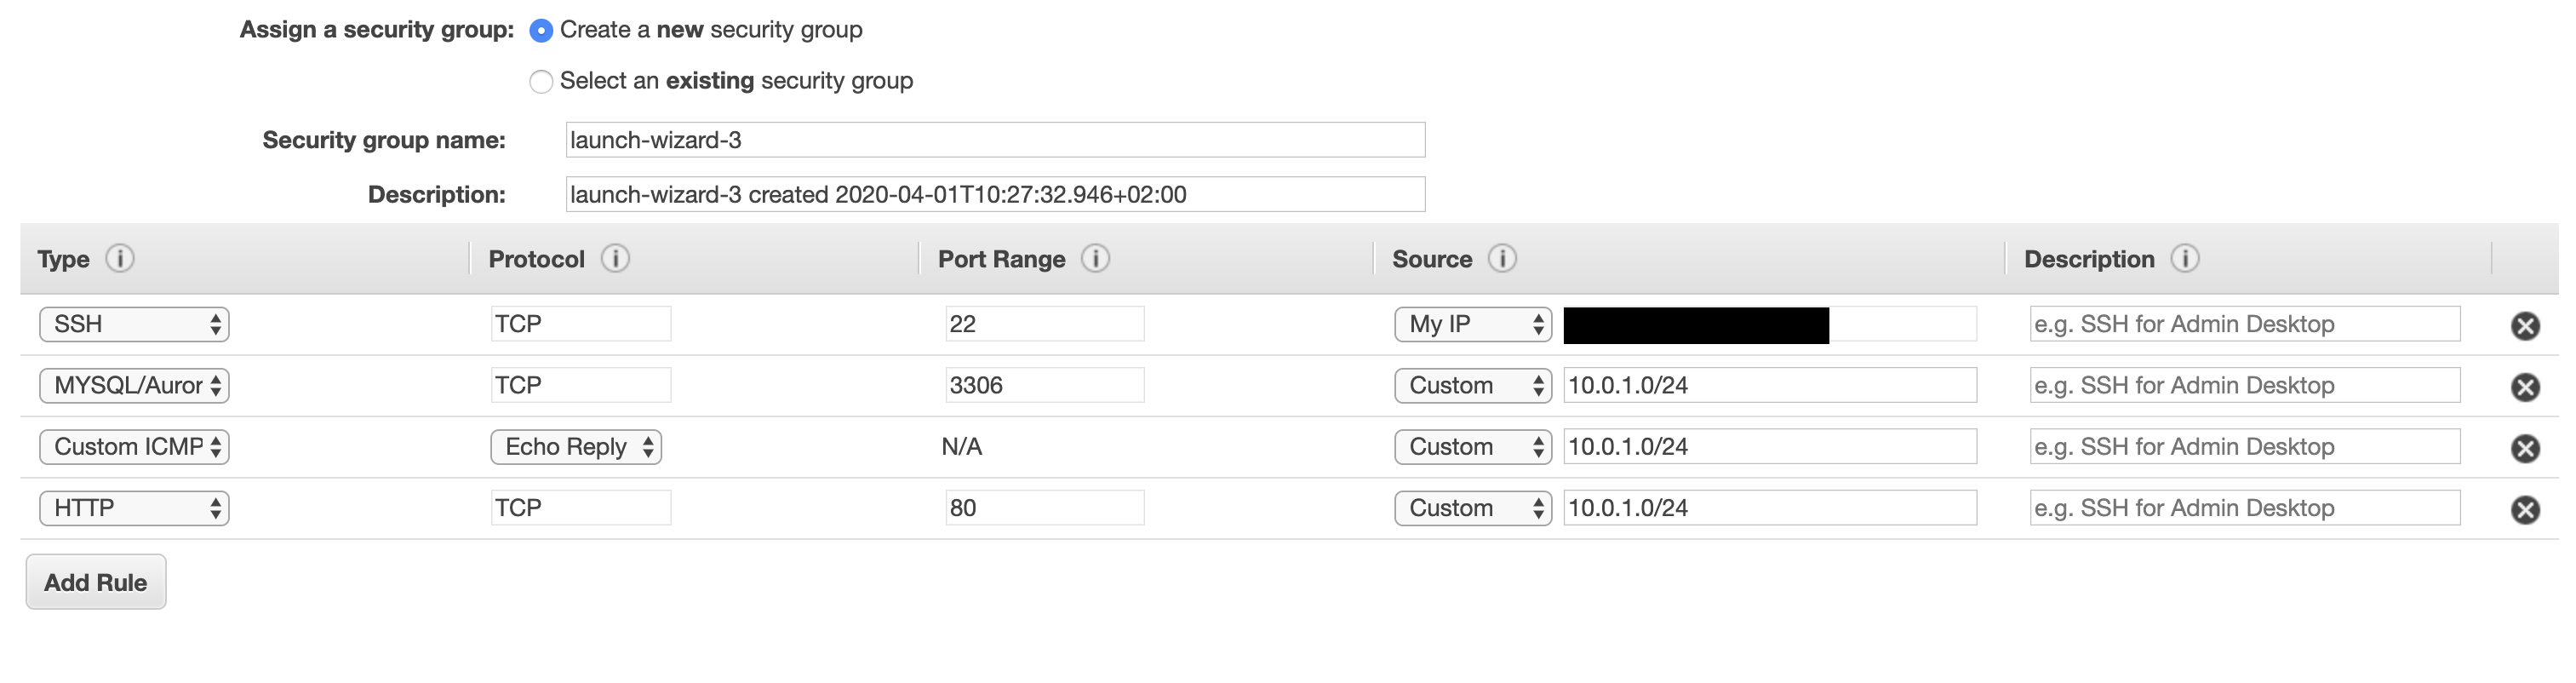
We need to connect the web server to the database, in order to do so, we must change the security group of the DB in order to allow mysql connection from the web server, plus ssh connection from the EC2 instance on the public subnet, for system administration.
Install Wordpress
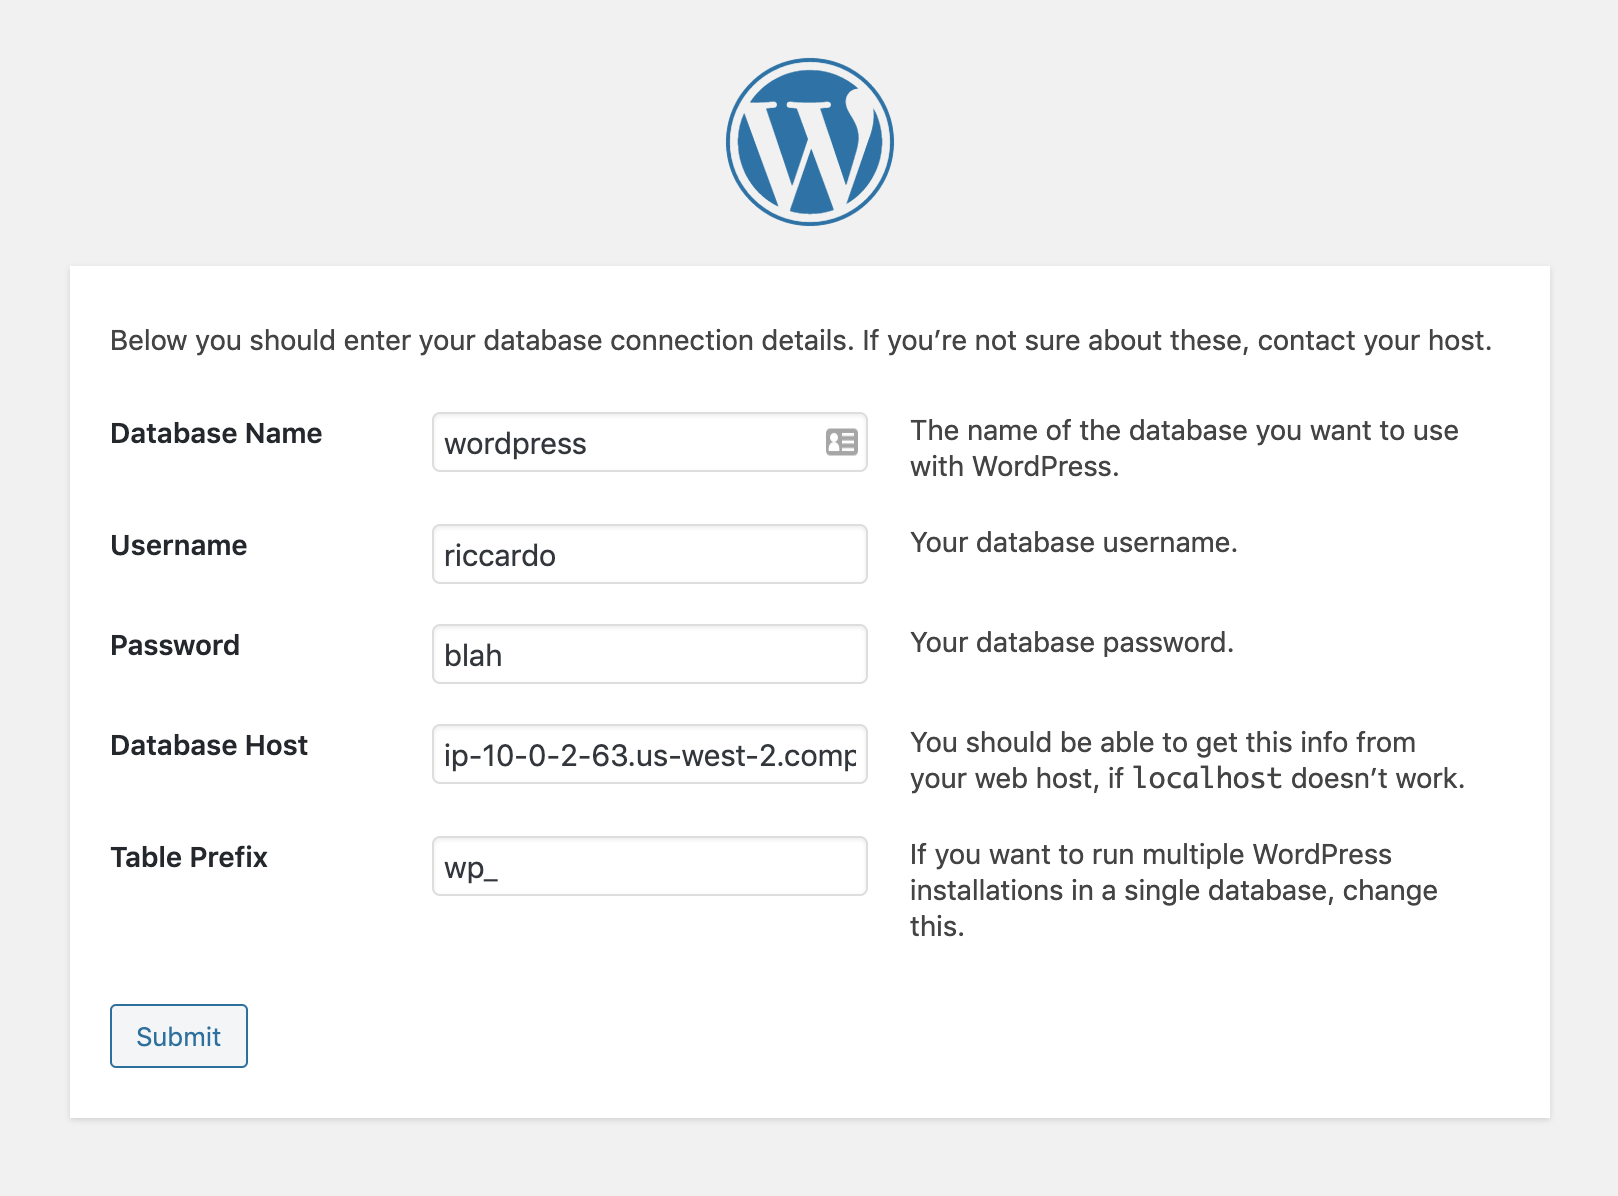
After all of this we can finally install wordpress.
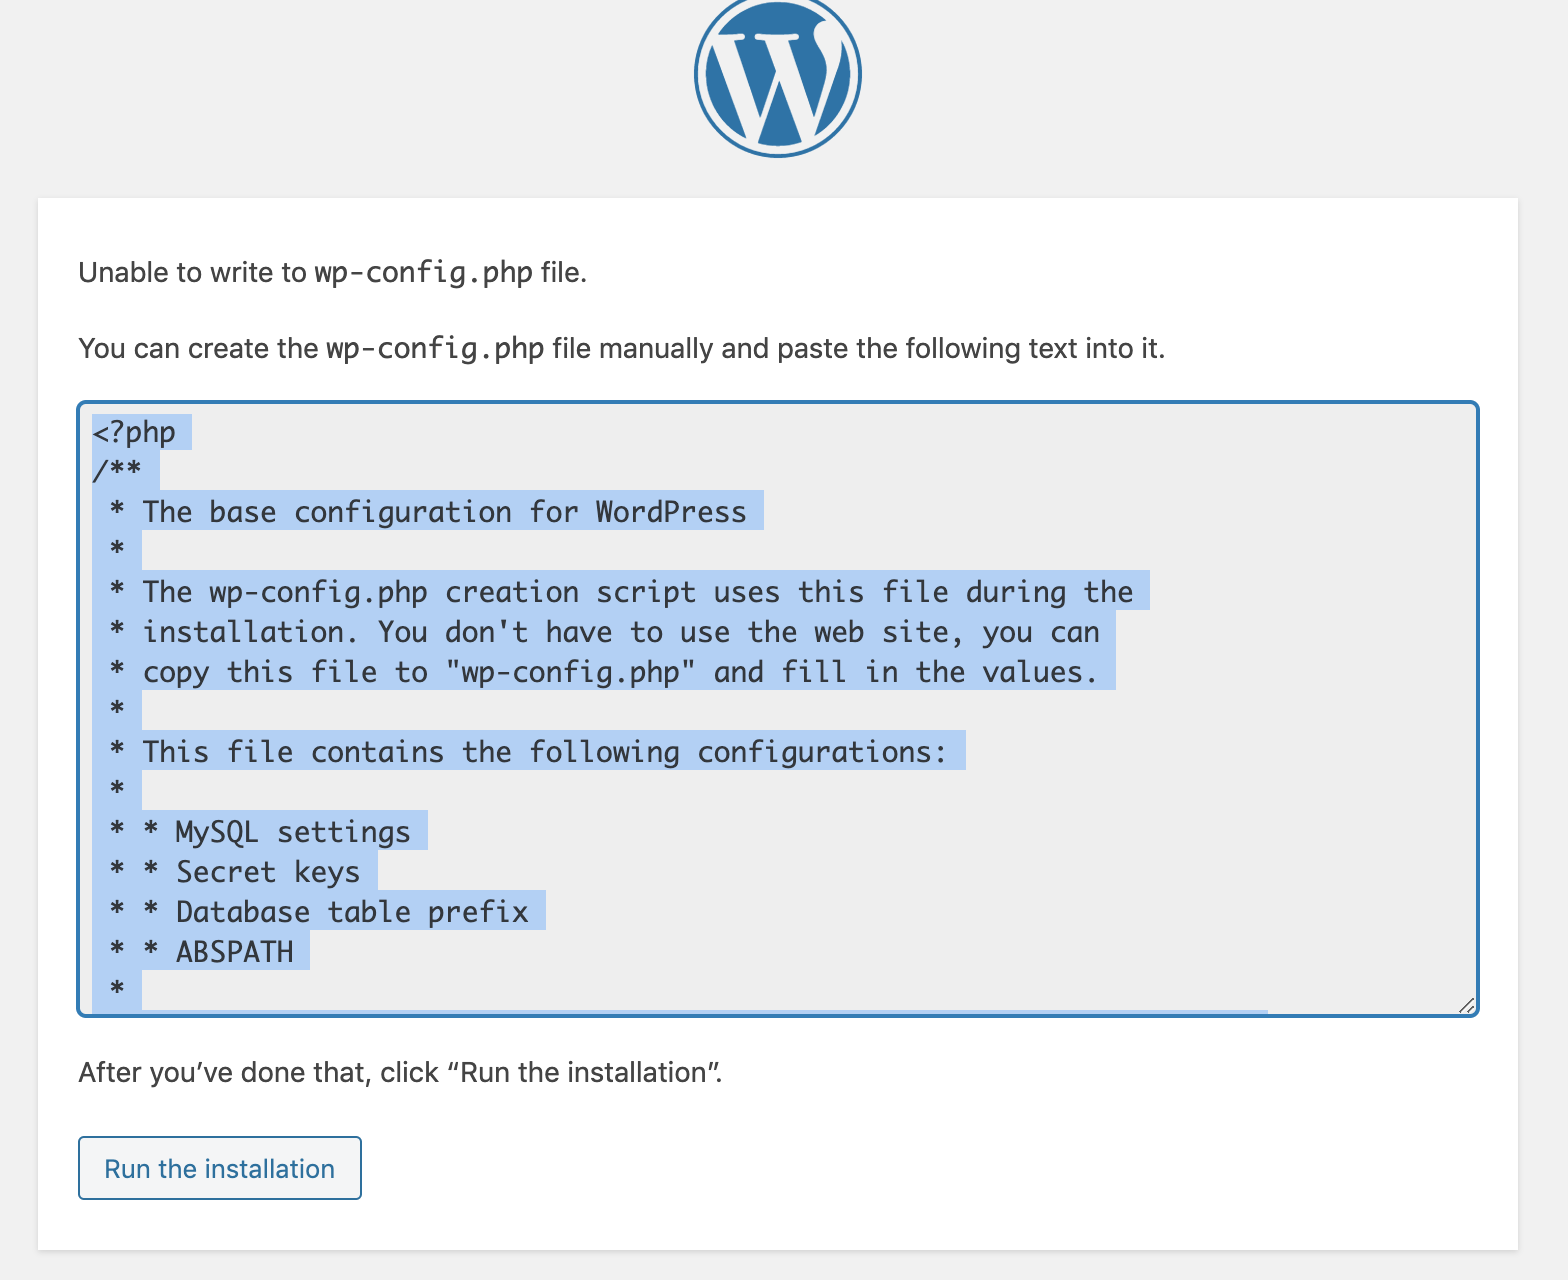
To do that, we open in a browser tab, the IP address of of our web instance. After that, we will be prompt to write the params for the connection to mysql. Once this is done, a wp-config file will be displayed on the web page. The content of this file is supposed to be put on the root path of wordpress.
Note that this step can be automated as well, this time i didn’t do it because it’s out of scope.
Conclusion
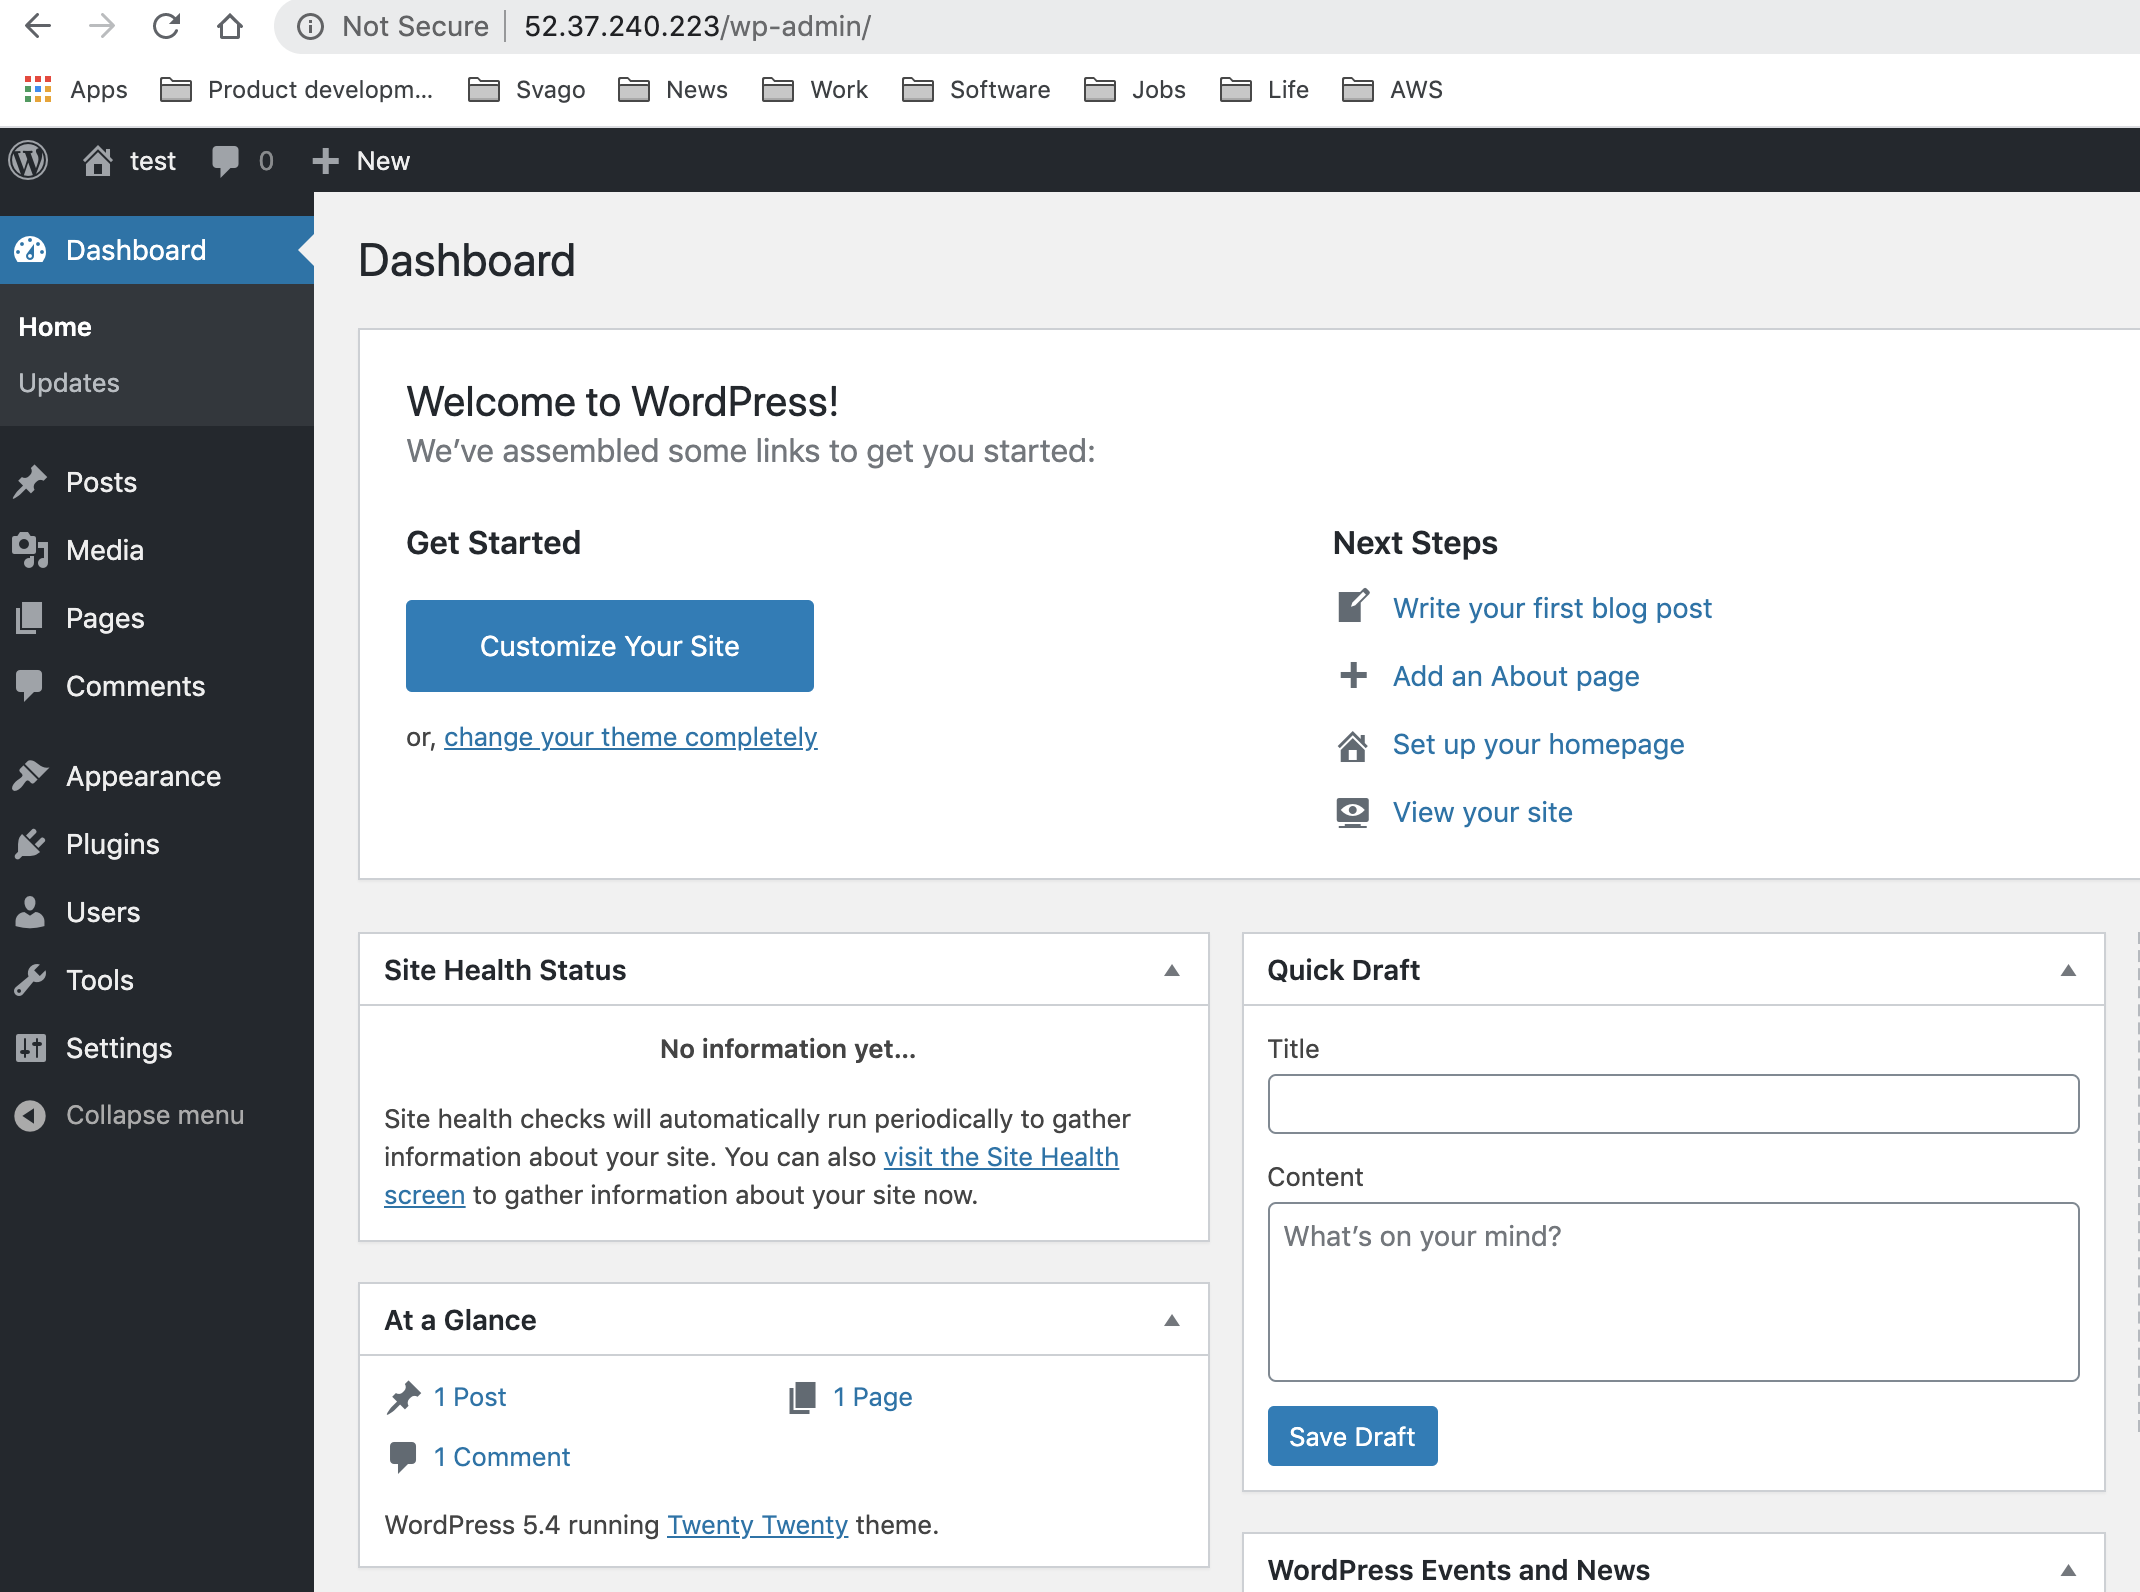
My conclusion is that aws allows to easily set up a simple web application.
Some things to point out:
- there is no HA here, single point of failure both in the application and data layer
- installing and maintaining a dbms requires a significant amount of effort to patch it and keep it stable, plus of course we have to set up backup/restore and all the services we need.
If i had to go to production i would revisit the design to include a load balancer, a scalable application group, and i would use Aurora for the data layer.